Shopify users: enable real-time personalization on your site, powered by Miso.ai, in a single afternoon

At Miso.ai, we’ve processed over 3.2 billion API requests this year, helping retailers, publishers, and streaming platforms leverage their first-party data to create real-time personalized experiences for their customers. But we’re constantly looking for ways to make personalization even more accessible, from both a data integration and front-end implementation perspective.
A platform that we really admire, and one that shares our mission of democratizing great e-commerce technologies is Shopify. Many of the world’s largest online retailers, such as Todd Synder, SKIMS, Good American, and Kylie Cosmetics, use Shopify at scale. There’s no doubt this is in large part due to the quality and breadth of Shopify’s ecosystem of marketplace apps, which allow easy extensibility of sites in rewards, returns, and ad personalization. However, one critical area of the end-to-end experience that’s missing is real-time personalization. That’s why we’re so excited to introduce Miso + Shopify. (I’m sorry I didn’t find the chance to say…oh just one more thing…)

If you’re a Shopify user, enabling real-time personalization on your site is a very direct and easy experience. In this guide, we’ll talk about:
- The benefits of adding real-time personalization to your site
- Miso.ai’s 1-click data integration via the Shopify App store
- Training an engine
- Adding UI elements with Miso.ai’s client-side SDK for JavaScript
Real-time personalization = increased user engagement
With Miso.ai, you can train your personalization models, which are based on historic and real-time user behavioral patterns, to anticipate a user’s shopping intent and affinities, in real-time. This empowers you to create unique, high-conversion experiences for your customers, even if they’re just visiting you for the first time, via 1:1 personalized product recommendations, search results, promoted listings, native ads, and more. All this can drive significant lift to your core shopping metrics across not just conversions (Impressions, Add to Cart, Checkouts) but also the AOV, Liquidity and overall GMV of your site. Over the 3 Billion API calls we’ve served, we’ve seen GMV gains of anywhere from 10–20% overnight just from turning on real-time personalization. And for more on where you can apply real-time personalization, check out our Recipes site.
Miso.ai’s 1-click data integration via the Shopify App store
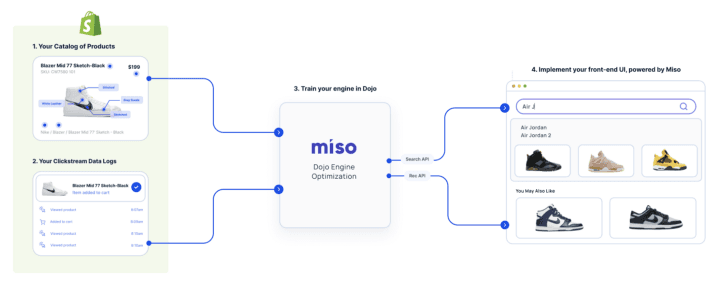
Enabling real-time personalization for your Shopify site requires two types of streaming data: user clickstream data and product catalog data. Fortunately, Shopify natively collects that data for you so the integration process is incredibly straightforward. Installing the Miso app extends the functionality of your Shopify site by:
- Initially synchronizing a snapshot your product catalog to Miso
- Setting up a webhook to collect future product updates
- Installing Miso’s lightweight and open-source JS plug to collect the clickstream events that occur on your Shopify site, such as page views, add to carts, checkouts, etc.
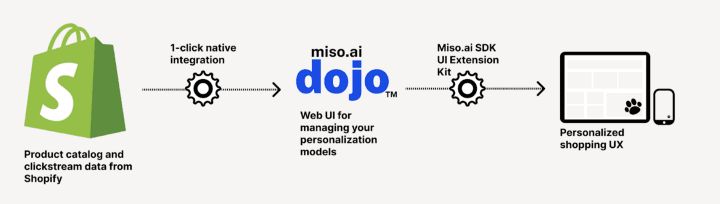
With the Miso app for Shopify installed, the data pipeline is set up behind-the-scenes so you can focus your efforts on the front-end user experience. Here’s how you can get the data integration set up:
-
Log into Dojo (Don’t have a Dojo account? Drop us a line here and we’ll get you sorted)
-
Navigate to the Integrations section and select Install in the Shopify tile.
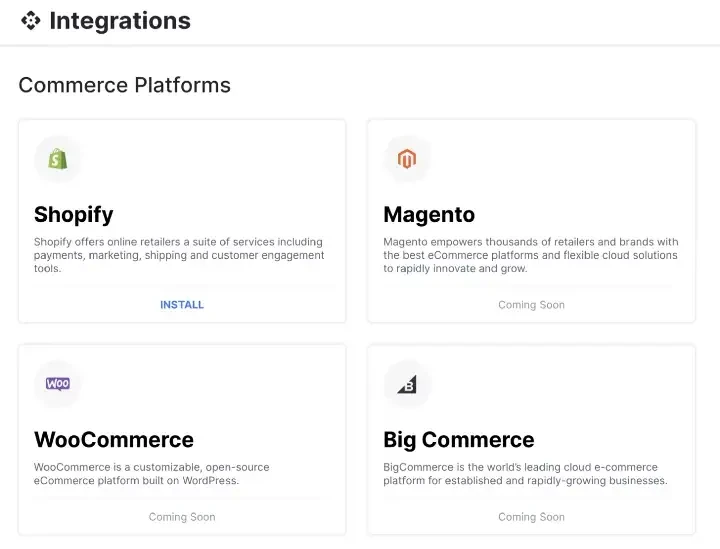
Miso.ai has support for most popular SaaS services, from commerce platforms to data warehouses -
Enter your Shopify store name and select Connect.
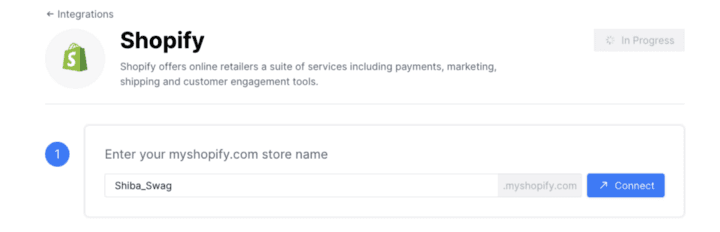
Unfortunately, not a real business. -
A Shopify page will open (you may need to login to Shopify first) and ask you to allow Miso to connect to your Shopify account. Select Install App to continue.
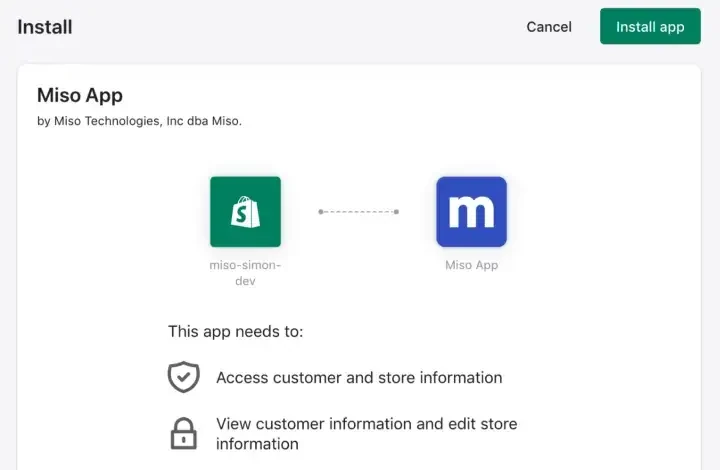
Learn more about our Privacy Policy (https://miso.ai/privacy-policy). TL;DR We don’t store, use, or need any customer PII in our models. -
And voila! Your data pipeline is set up to send Miso product catalog updates and clickstream data from your customers.
Training an engine
Once your Shopify account is connected to Miso via the app, the next step is to configure your personalization engines. Engines are machine learning models that are locally trained on your data and continue to learn and improve automatically over time. Currently, there are two types of Miso real-time personalization engines that you can train — search and recommendation.
As you might expect, the search engine is used to power the semantic search on your site, by taking query keywords as input and outputting a rank-sorted list of relevant search results, with all of the bells and whistles of query expansion, understanding, and semantic modeling of your catalog. On the other hand, the recommendation engine drives the product recommendations on your site, whether it’s products being recommended to individual users, finding similar products based on an anchor product, or even cart up-selling suggestions to qualify for free-shipping.
Although we won’t go into the details of engine training in this article, there’s an easy to follow guide on our docs site to get you up and running.
Adding UI elements to your Shopify storefront with Miso.ai’s client-side SDK for JavaScript
Miso.ai follows an API-first design, meaning that the primary method of interacting with your personalization models and returning product recommendations to your customers is via REST API requests. However, Miso also has a client-side SDK for JavaScript to help lessen the load on the front-end implementation and allow you to quickly visualize the returned results. In fact, if you’ve been following this guide and have installed the Miso Shopify app, the SDK will be automatically installed for you.
Note that the following steps involve editing .liquid files and are therefore applicable to you only if your storefront is utilizing a Shopify theme. If you use Shopify headlessly and have a custom presentation layer, you’ll have a lot more freedom and flexibility to implement Miso-powered UI components. We’ll publish a specific guide on that soon.
And to add in a bit more context, if you’re part of the large share of Shopify users who use server-side liquid template pages to build out your storefront (as opposed to a headless approach), you may already know that the liquid DSL can’t process API requests directly. Miso’s client-side SDK for JavaScript uses a custom HTML element called <miso-list> for this purpose. We’ll get into that later.
So with these caveats out of the way, you’ll need to place a Miso product shelf inside a Shopify template:
-
From your Shopify Admin, go to Online Store
-
Click Actions > Edit Code
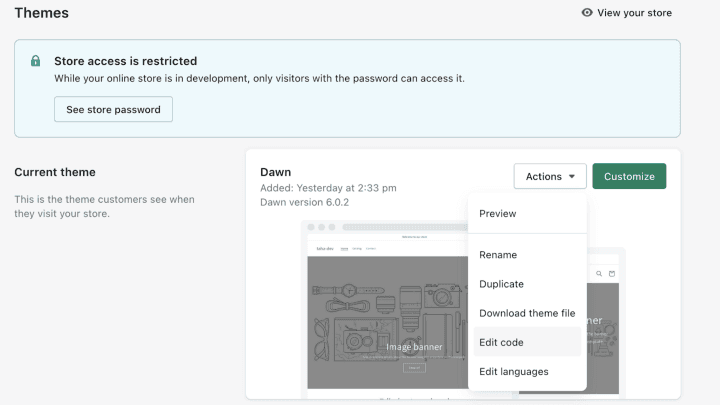
“Roads? Where we’re going, we don’t need roads!” — Dr. Emmett Brown, Back to the Future -
Under your Sections folder, select Add a new section
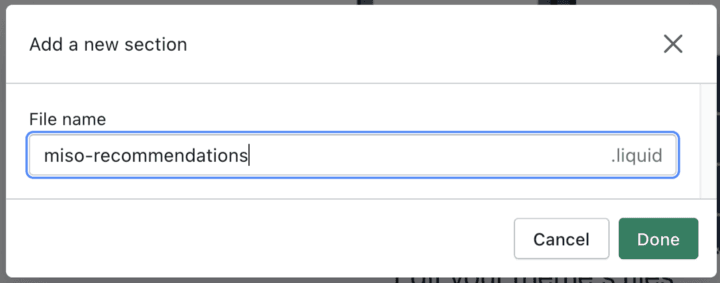
The file name doesn’t really matter — use whatever taxonomy is helpful for you -
At the bottom of the newly created section file, create an empty
. Using the below example as a guide, place aelement and the item/container templates inside. The element makes an API request to a Miso endpoint (the User to Products API in this example), which returns a list of product recommendations for an individual user. Those recommendations need to be rendered, which is handled by defining templates called “container” and “item” and specifying the product attributes of interest, such as the title, price, and image. The payload can be amended to include filters, merchandising rules, and more. Check out our API specification for more information. 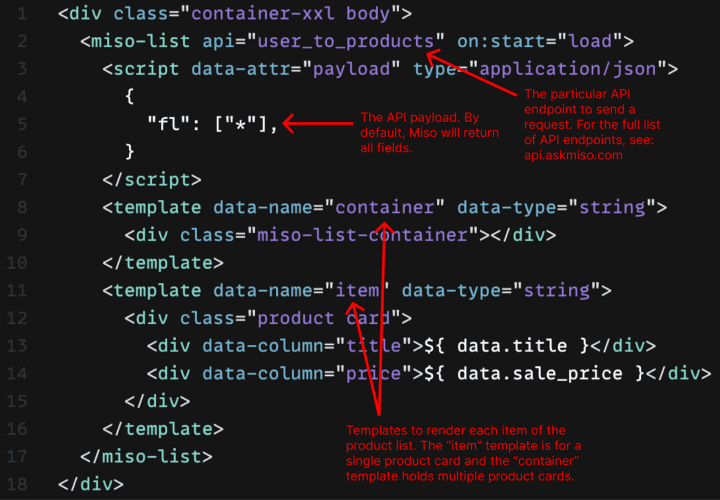
An example implementation of the custom miso-list HTML object, including a template for the product card within a recommendation product shelf -
The final step is to apply styling to the
<div>to be consistent with the look and feel of your site. We’ll leave that part up to you. After it’s all said and done, adding a recommendation product shelf to the bottom of a product detail page looks something like this: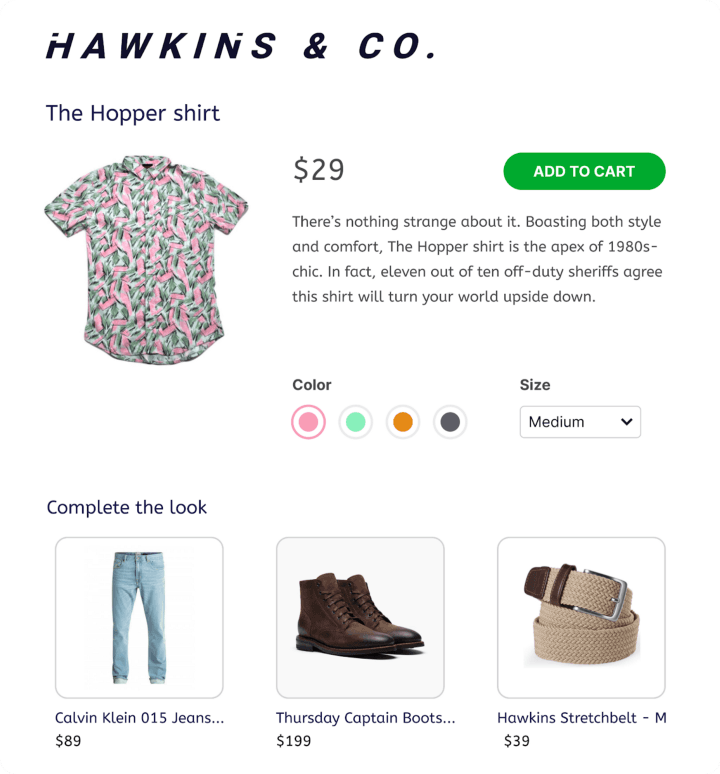
Shout-out to Netflix’s Stranger Things: Season 4
To be honest, this is really just the v0.1 of our front-end SDK support for Shopify. What can we say? They said if you’re not embarrassed by your first release, you waited too long. So here we are.
Adding custom HTML and JavaScript to a Shopify liquid file isn’t the most elegant method we can imagine, but that’s a common problem with manipulating domain-specific languages like liquid. You will likely need a developer resource to handle this part of the process or be ready to brush up on your own coding skills. However, the good news is that we’re currently in the process of revamping the Shopify theme modification process on our end to make it as seamless as the rest of our integration. Stay tuned. The dream of turn-key integration is nigh upon us! (Sorry too much time rewatching “Lord of the Rings: The Rings of Power” on repeat.)
Final Thoughts with Taha
Real-time personalization that’s intent-based has been arguably one of the top super-powers that made Amazon the 10,000 lb. gorilla that it is today. And while that’s amazing, it’s frankly unfair that it’s been so out of reach for retailers and brands to turn on themselves, without recruiting and scaling their own ML teams to try to make those rec-sys and search systems work.
We’re really excited with these releases to be making real-time personalization work on one of the largest platforms out there in Shopify. And we’ve just been amazed by not just the number of Shopify stores serving large catalogs, but the breadth of niches and fashion styles they serve. Hopefully this guide is just one of many updates as we really hit the gas for this awesome and vital community, so stay tuned for more content coming soon!
And lastly, you’re awesome! I’m impressed you stuck through reading this till the end. Want a sticker? No, seriously, drop us a line here or at hello@askmiso.com and we’ll mail one to you. We’d love to hear what you thought of this and what topics we can cover next for you!
